Friday, December 27, 2019

Introduction to 5G Authentication Security

Introduction
Upon switching on mobile phone, it will start to search for available cellular networks nearby, and register itself into the subscribed network using some secrets in USIM card. In this chapter, we will discuss how 5G-AKA has improved the security of this process. However, in order to understand it better, we need to go through some history from 2G (GSM), 3G (UMTS) and 4G (LTE) first. It would help us understand why 5G-AKA is designed in this way.

What is AKA
Authentication and Key Agreement (AKA) is a set of rules (i.e. a protocol) to allow mobile phone and core network to exchange their identity and secret keys for communication. Authentication is a way to make sure both two parties are trustworthy: let say if you want to go to the university library, you will check the address of the library to make sure the library is not a fake one. At the same time, the library staff will also ask you to show your student ID card to make sure that you are the eligible users (e.g. student) of this library. Key agreement is a way of negotiating one common secret key without revealing the key to any third parties. Diffie-Hellman key exchange or computed keys based on common secret are some commonly used methods.

AKA in GSM:
Here is the simplified flow of GSM attach authentication process (EAP-SIM, RFC 4186).
MSC = Mobile Switching Center (the main switch of voice calls)
VLR = Visitor Location Register (a database storing connected devices)
HLR = Home Location Register (the central database of all mobile subscribers details)
AUC = Authentication Center (the functional entity which only focus on running authentication)

In the picture it shows that, when the mobile device is switched on, it will immediately send a request access message which contains the IMSI of the USIM to MSC. Then, VLR will only send a RAND signal to UE to ask for its reply. Also, the final judge of authentication success is located in VLR. As a result, it will have (at least) these 3 main problems:
  • By listening to the IMSI in request access messages, eavesdroppers can track a specific device.
  • UEs have no way to make sure the cellular network is trustworthy (it just reply a RAND!).
  • Authentication decision is made in VLR instead of AUC, which is potentially dangerous.
Not to mention that the predictability of A3 and A8 algorithm could be higher than expected, it is easy to justify that GSM is insecure in many aspects.

---

AKA in 3G (UTRAN, UMTS):
UTRAN (UMTS Terrestrial Radio Access Network) had improved the authentication system slightly. The main focus of the improvements are generating more different keys for different controls. Although the term "temporary identity (pseudonym)" is appeared in EAP-AKA (RFC 4187), the actual implementation still largely follows the GSM way - IMSI is sent in clear text during registration.

---

AKA in 4G (E-UTRAN, LTE):
After some painful lessons from 2G and 3G, 4G LTE tried to tackle the problem of mutual authentication and user tracking. Here is the simplified flow of EPS-AKA:
GUTI = Globally Unique Temporary Identity
AUTN = Authentication Token

After the first registration which uses IMSI, the USIM will be assigned with a new temporary identity called GUTI. This GUTI will be used for next registration, and it will be updated periodically to prevent eavesdroppers to trace the device easily. Besides, since the cellular network will send an extra field (AUTN) to UE as a feedback, UE can use it to make sure the network is legitimate. Unfortunately, there are still some problems found:
  • EPS-AKA is still prone to man-in-the-middle (MITM) attack (check here). This is largely because by the time of releasing EPS-AKA, no formal verification was done, so nobody discovered it at the beginning.
  • GUTI are not changed as frequently as necessary, and it is easily predictable.
  • Authentication decision is still made on MME instead of HSS, which is still dangerous.
Some people asked why 4G LTE is still widely used with so many security issues.
However, think about that:
  • Expensive equipment - buying eNB from market is generally expensive for hackers.
  • Legislation - radio frequently usage is strictly monitored by government, and the location of fake stations can actually be traced quite easily.
  • Lack of alternatives - there is no other choice in the market until 5G launch.
---

AKA in 5G (5GC, NR):
Finally, we have come to 5G era. The new implementation looks like the following:

If you look close enough, you will find that the authentication process still looked very similar to EPS-AKA. However, there are some major improvements:
  • SUCI is an encrypted SUPI (IMSI in EPS core network), therefore, even in the first registration UE will not reveal its identity to eavesdropper.
  • New entities such as "SEAF", "AUSF", "UDM/ARPF" are created to split the tasks to many servers/entities.
  • Authentication decision cannot be solely done in SEAF (which is located in AMF). In fact, SEAF can reject the authentication at any time, but it can only approve authentication after receiving the authenticate response from AUSF.
In fact, there are some researchers doing formal verification of 5G-AKA, and they provided quite reasonable comments about it (check here).

By the way, since 5G supports Non-3GPP AN, 5GC will support various AKA protocols such as EAP-AKA' (improved EAP-AKA) and EAP-TLS. Also there will be a specific functional entity (N3IWF) to handle the signal transmission in Non-3GPP AN. Since this part is also quite complicated, so I will skip it until I need to write them.

---

Reference:

[1]: A Comparative Introduction to 4G and 5G Authentication - https://www.cablelabs.com/insights/a-comparative-introduction-to-4g-and-5g-authentication
[2]: Authentication In GSM - https://www.youtube.com/watch?v=82NYPC3zwiA
[3]: GSM Authentication Procedure - https://diameter-protocol.blogspot.com/2013/06/gsm-2g-authentication-procedure.html
[4]: UTRAN Authentication Procedure - https://diameter-protocol.blogspot.com/2013/06/umts-3g-utran-authentication-procedure.html
[5] - 3GPP 33.501 V15.2 - https://portal.3gpp.org/desktopmodules/Specifications/SpecificationDetails.aspx?specificationId=3169

Thursday, December 26, 2019

5G Security Architecture 安全架構初探

引言
理論上,5G(第五代流動通信)不但具有更快的速度、更高的頻譜效益,還有更高的安全性。 其中一個具體例子,就是手機註冊流程。相比起 4G 使用的 EPS-AKA,5G 使用的 5G AKA 既能更加有效防止竊聽者的追蹤,也能減少在漫遊下,手機身分被盜用的風險。

本文章會先分析 5G Core 中,與保安相關的 Functional Entities 的名稱及功能。然後在下一篇文章,會詳細解釋 5G-AKA 的運作原理,以及與 4G EPS-AKA 的異同之處。

基本保安架構
名詞解釋:
  • ME = Mobile Equipment 
  • USIM = Unique Subscriber Identity Module
  • 3GPP / Non-3GPP AN = 3GPP / Non-3GPP Access Network
  • SN = Serving Network
  • HE = Home Environment
簡單來說,就是 ME(手機)會與 USIM(電話卡)交換資料,為上層的應用提供保安。
而手機會利用 3GPP AN(例如基地台)或 Non-3GPP AN(例如 Wi-Fi 熱點)與 Serving Network(最就近的網絡)溝通。同時,Serving Network 也需要索取有關你 USIM 的資料,用作認證身分。而且,Serving Network 有時未必是 Home Environment(你訂購的網絡)(例如漫遊情況下)。所以,兩者會一起合作,為上層提供保安。

四個主要的保安個體 (Four Fundamental Entities)

  • UE (User Equipment) - 毋庸置疑,手機終端是最重要的個體。
    手機中會插著 USIM 卡,而且手機正正就是資料的使用者。
  • AMF (Access and Mobility Management Function) - 它與 4G EPC 的 MME (Mobility Management Entitiy) 十分相似。與 MME 不同:它不會處理與 Session 相關的工作,只會把 Session 相關的訊息 forward 去 SMF 處理。但是,與 MME 相似:它也會處理 Mobility Event 的 Notification。在保安方面,它只會負責做 SEAF (Security Anchor Functionality),把 SUPI / SUCI 的 request / response forward 去 AUSF / UE。
  • AUSF (Authentication Server Function) - 它只負責做 Authentication 相關的工作,也就是處理所有來自 3GPP / Non 3GPP AN 的 5G AKA / EAP-AKA' / EAP-TLS 的請求。
  • UDM (User Data Function) - 又稱 ARPF (Authentication credential Repository and Processing Function)。它就是一個儲存 SUPI 和所有 secret key 的倉庫。與 4G 的 HSS 一樣,它只會回應合法的請求。而且,它保證所有 Secret keys 都不會離開它,因為它只會回應 hashed keys / calculated keys。而與 4G HSS 不同:4G HSS 有很多其他功能,而 UDM 只有這一個功能,所以相對簡單。
5GC 的明確分工,不但有助防止伺服器過度繁忙,更令局部強化變得簡單。例如:如果有非常多人進行 5G-AKA,只需要開多一台 AUSF 即可解決。又例如,如果某一天需要改掉 secret key 的加密方法,我們只需要更新一下 UDM 就可以,而不會影響 HSS 的其他功能。

註:SMF (Session Management Function) 與 4G 的 SGW 相似,它只做 Session Management,並不提供保安相關功能。而 UPF (User Plane Function) 也一樣,只根據用戶身分,進行 application detection 和 QoS control,同樣不會提供保安相關功能。

---

參考:

[1] 3GPP 23.501 V15.7 - https://portal.3gpp.org/desktopmodules/Specifications/SpecificationDetails.aspx?specificationId=3144

[2] 3GPP 33.501 - V15.2 - https://portal.3gpp.org/desktopmodules/Specifications/SpecificationDetails.aspx?specificationId=3169

Thursday, December 19, 2019

在 Mac OS X Catalina 下運行 FAME

FAME (Fast Attribute-based Message Encryption) 是由 Visa 及 Microsoft 的研究人員發表的 ABE (Attribute-based Encryption) 。不論加密速度,解密速度,以及私鑰大小,均比最主流的 BSW (John Bethencourt,  Amit Sahai,  Brent Waters) 所發布的方法更快 [1]。而近年來,隨著 Functional Encryption 的概念越來越流行,FAME 的作者也使用 Charm Crypto Framework [2] 來實作了 FAME 的雛型。

由於 Charm 的範例中已經包含 FAME 的演示源碼,故以下簡介 Charm 的安裝步驟:

1. 下載 Charm Crypto 的源碼  
網址: https://github.com/JHUISI/charm

2. 安裝 OpenSSL 及 LibreSSL
輸入 brew install openssl 及 brew install libressl
再將 LibreSSL 或 OpenSSL 放入 .zshrc 中:
export LDFLAGS="-L/usr/local/opt/libressl/lib"
export CPPFLAGS="-I/usr/local/opt/libressl/include"
echo 'export PATH="/usr/local/opt/libressl/bin:$PATH"' >> ~/.zshrc

3. 按指示安裝 Charm
先 checkout dev branch,執行 ./configure --enable-darwin,再 make install 及 make test

4. 下載 FAME 原作者的 main example
https://github.com/sagrawal87/ABE

5. 執行原作者的 example
python main.py 或 python3 main.py
如果發現有問題,可改一下 ac17.py 中的第 19 行:
-from msp import MSP
+from charm.toolbox.msp import MSP
儲存後重試即可。你也可修改 debug = True ,查看詳細運作原理。


---
參考:

[1]: FAME - https://dl.acm.org/citation.cfm?doid=3133956.3134014
[2]: Charm: a framework for rapidly prototyping cryptosystems - https://link.springer.com/article/10.1007/s13389-013-0057-3

Functional Encryption 初探

近年來,Functional Encryption 越來越引起大眾的關注。不同的 Libraries 也開始以 Functional Encryption 作為構思藍本,包括 CiFErGoFE 等等。事實上,FE 的概念,早在 2005 年左右就已經出現,而 Dan Boneh 在 2010 年發布的一篇論文「Functional Encryption: Definitions and Challenges」[1] 則正式地對這個詞語下了一些定義。

Functional Encryption 的定義,主要包括以下數項 [2]:
  • 它是 Public Key Encryption 的一種(也就是非對稱加密)
  • 「滿足既定條件,就能知道內容」
    • 在傳統的 Public Key Encryption 中,「條件」只有一個,就是持有私鑰。
      而在 Functional Encryption 中, 加密者持有的,並非一對一的公鑰。
      而解密者即使持有的私鑰,也未必等於可以解開內容。

      例如 IBE 中,加密者可以根據受眾的名稱加密,
      而解密者只能解出以自己的名稱加密的內容。
      每個解密者會有不同的私鑰,但加密者卻只需要持有一套公鑰。
  • 整個加密系統可以分成四個部分:Setup / Keygen / Encrypt / Decrypt
    • Setup 是指由系統管理員產生 Public Key Parameters 及 Master Key。
      Public Key Parameters 可以公開,但 Master Key 只有系統管理員知道。
    • Keygen(或者稱為 Extract)是指使用者向系統管理員索取 Secret Key。
      管理員會按著使用者的名稱、身分等不同屬性,用 Master Key 產生一條獨特的 Secret Key 給用家。
    • Encrypt 是指加密,運用 Public Key Parameters 加上不同的屬性來加密內容。
    • Decrypt 是指解密,以私鑰來解開內容。
      只有當 Secret Key 符合 Encrypt 時的屬性,密文才能解開。
典型例子:包括 IBE,ABE 及 CP-ABE 等。

有部分人會將 FE 跟 Fully Homomorphic Encryption (FHE) 混為一談 [3] 。
事實上,兩者不互相衝突,技術上也可以同時存在,只是學者們仍未提出具體的演算法。

---
參考:

[1]: Functional Encryption: Definitions and Challenges - https://eprint.iacr.org/2010/543.pdf
[2]: Functional Encryption - http://cryptowiki.net/index.php?title=Functional_encryption
[3]: Forget Homomorphic Encryption, Here Comes Functional Encryption - https://research.kudelskisecurity.com/2019/11/25/forget-homomorphic-encryption-here-comes-functional-encryption/

Thursday, December 12, 2019

IntelliJ IDEA + JPBC 設置

使用 IntelliJ IDEA IDE 設置編譯 JPBC 方法

1. 開完新 Project 後,將 jpbc-2.0.0/jars 的內容放進 project/lib 中
2. 在 IntelliJ 的界面的 Toolbar 中,按 File
3. 按 Project Structure ( Ctrl+Shift+Alt+S / ⌘+; )
4. 按 Modules
5. 在 Dependencies 的 Tab 中,按下 + → JARs or directories
6. 選取 project/lib 整個資料夾
7. OK 並再次 Build Project。

成功截圖:
---

參考:
https://stackoverflow.com/questions/1051640/correct-way-to-add-external-jars-lib-jar-to-an-intellij-idea-project

電子簽名 Digital Signature: ECDSA

現實中常遇到的一個問題:
假設有兩個人 Alice 和 Bob,他們不能互相見面,只能透過不同的中間人轉發訊息。
可是,他們想確認接收到的訊息,真的是由對方發出的。

在這個情況下,因為每個人都有 Bob 的 Public Key (PKBob),
所以即使 Bob 收到 Enc({I am Alice}, PKBob),也不能代表這句是由 Alice 發出。

面對這種情況,有兩種解決方法。

第一種是 Alice 和 Bob 先互相見面,交換機密,然後 Alice 和 Bob 之間可以透過不斷試探對方(例如問機密中有沒有某個字),來確認對方的身份。這種做法叫 ZKP (Zero Knowledge Proof),雖然聽起來簡單,但操作起來並不容易。因為要互相見面一次,而且試探過程不能只問一條問題。所以,要透過問多條問題,還要小心選題,才能 99.999...% 確保對方身分。

第二種方法,就是利用電子簽名,就比較常用。由於每個人都會儲起自己的 Private Key,所以如果我可以利用自己的 Private Key 為文章做些記號,然後讓對方用我的 Public Key 驗證這個記號,對方就能 100% 相信,文章是我寫的(因為理論上只有我才有自己的 Private Key)。這種方法既可以善用 Public / Private Key,又可以確保 non-repudiation,所以一直都十分受歡迎。

---

ECDSA (Elliptic Curve Digital Signature Algorithm) 的算法:

公開參數 Public Key Parameters:
α, β (elliptic curve), p (large prime), G (elliptic curve base point), n (order), h (co-factor)
公鑰 Public Key: d_a
私鑰 Private Key:d_a • G
訊息: m

簽名過程:
先選一個 random k (under integer with order n (n)),
計算出 P = k • G = (x_p, y_p)。
再計算 r = x_p mod ns = [ k^(-1) * (m + r * d_a) ] mod n。
最後產生 output signature = (s, r)。

驗證過程:
先計算 u_1 = ( s^(-1) * m ) mod n
再計算 u_2 = ( s^(-1) * r ) mod n
得出 P = u_1 • G + u_2*(PK) = u_1 • G + u_2*d_a • G
= {[( s^(-1) * m ) + ( s^(-1) * * d_a )] mod n } • G
= {[ (s^(-1)) * ( m + * d_a )] mod n } • G
= {[ k^(-1) * (m + r * d_a) * ( m + * d_a ) ] mod n } • G = (x_p, y_p)
如果 r = x_p mod n,則代表驗證成功。

詳細證明的話,需用到 elliptic curve 的 multiplication / addition 公式,
由於比較繁複,所以到有需要就再補充吧。

---

參考:
[1] https://www.maximintegrated.com/en/design/technical-documents/tutorials/5/5767.html
[2] Chapter 13.5 - Elliptic Curve Digital Signature Algorithm - (P.430), CRYPTOGRAPHY AND NETWORK SECURITY PRINCIPLES AND PRACTICE SEVENTH EDITION, William Stallings

Thursday, December 5, 2019

Compile CPABE Toolkit in Mac OS X 10.15.1 (Catalina)

CPABE Toolkit 是一套由 John Bethencourt 開發的 CLI 加密小工具,
主要可以用作演示和了解 CP-ABE 的運作模式。

1. 下載以下兩個 Package:
網站: http://acsc.cs.utexas.edu/cpabe/index.html
主程式: cpabe-0.11.tar.gz
函數庫: libbswabe-0.9.tar.gz

2. 確保已經安裝 OpenSSL, NTL Library, GLib:
OpenSSL 可以通過 brew install openssl 安裝。
GLib 則可以通過 brew install glib 安裝。
NTL 可以由 https://www.shoup.net/ntl/download.html 下載。
NTL 安裝教學: https://www.shoup.net/ntl/doc/tour-unix.html (很簡單的)

3. 編譯及安裝 PBC:
https://crypto.stanford.edu/pbc/files/pbc-0.5.14.tar.gz 下載 PBC
執行 tar zxf pbc-0.5.14.tar.gz 解開封包,然後 cd pbc-0.5.14
然後執行  ./configure ,make 和 sudo make install

3. 編譯及安裝 libbswabe:
執行 tar zxf libbswabe-0.9.tar.gz 解開封包,然後 cd libbswabe-0.9 
執行 ./configure CFLAGS="-I/usr/local/opt/openssl@1.1/include" LIBS="-L/usr/local/opt/openssl@1.1/lib"
執行 make CFLAGS="-I/usr/local/opt/glib/include/glib-2.0 -I/usr/local/opt/glib/lib/glib-2.0/include -I/usr/local/include/pbc"
最後 sudo make install

4. 編譯及安裝 cpabe:
執行 tar zxf cpabe-0.11.tar.gz,然後 cd pbc-0.5.14
執行 ./configure CFLAGS="-I/usr/local/opt/openssl@1.1/include -I/usr/local/include" LIBS="-L/usr/local/opt/openssl@1.1/lib -L/usr/local/lib"
最後執行 make 及 sudo make install

如果一切順利,可以 Cmd+N 開一個新的 Terminal,然後查看 which cpabe-setup。
成功的話,會看到它返回 /usr/local/bin/cpabe-setup

5. 小記
在 Catalina 中,這個 Project 需要更改以下兩行:
diff --git a/policy_lang.c b/policy_lang.c
index 7b7672a..2351ea9 100644
--- a/policy_lang.c
+++ b/policy_lang.c
@@ -1942,14 +1942,14 @@ cmp_policy( sized_integer_t* n, int gt, char* attr )

     /* some error checking */

-    if( gt && n->value >= ((uint64_t)1<<(n->bits ? n->bits : 64)) - 1 )
+    if( gt && n->value >= (n->bits ? (((uint64_t)1<<(n->bits))-1) : UINT64_MAX) )
         die("error parsing policy: unsatisfiable integer comparison %s > %llu\n"
                 "(%d-bits are insufficient to satisfy)\n", attr, n->value,
                 n->bits ? n->bits : 64);
     else if( !gt && n->value == 0 )
         die("error parsing policy: unsatisfiable integer comparison %s < 0\n"
                 "(all numerical attributes are unsigned)\n", attr);
-    else if( !gt && n->value > ((uint64_t)1<<(n->bits ? n->bits : 64)) - 1 )
+    else if( !gt && n->value > (n->bits ? (((uint64_t)1<<(n->bits))-1) : UINT64_MAX) )
         die("error parsing policy: trivially satisfied integer comparison %s < %llu\n"
                 "(any %d-bit number will satisfy)\n", attr, n->value,
                 n->bits ? n->bits : 64);

Tuesday, December 3, 2019

初探 bilinear mapping

Bilinear Map 是不少新型 Pairing-based Cryptography 的基礎概念。
當中雖然有不少難明的數學,但我們仍然可以在用最少數學的情況下理解它。

---

假設有兩個 Cyclic Groups (G1 和 G2)。
它們中間有一個 mapping function,可以找出相對應另一個新的 Cyclic Group (Gt)。
只要輸入 G1 和 G2 的成員值,它就會為你找出對應的 Gt 成員值。
我們先稱這個 mapping function 做 e 。

這個 mapping function e 有一些好用的特性:
假設 u 是 G1 的成員,v 是 G2 的成員,w 是 Gt 的成員,它就可以:
e( u^a, v^b ) = e( u,v )^(ab) = w^(ab)

其實這種 mapping function 有點難找,計算上也未必容易,
所以,我們只考慮那些 efficient 的 bilinear map,並稱它們做 admissible bilinear map。

而在加密學中最好用的 mapping,就是當 G1 = G2 的那一種。
所以在不同的文章,普遍都會假定 G = G1 = G2 。

---

目前有兩大方法可以找出 bilinear mapping function,其中一種是 Weil Pairing,另一種是 Tate Pairing。由於牽涉太多數學和計算機科學,而且不好理解,所以不在此詳述。

---

以下一個例子,證明 bilinear map 其實很好用:

1. Decisional Diffie-Hellman
給定 g, g^a, g^b, g^z, 判斷 a*b = z 。
沒有 bilinear map,你必須先試出 a 和 b 的值,然後才知道。
(按:(g^a)*(g^b) = g^(a+b),所以真的只有不斷試,沒有捷徑)

但當有 bilinear map,事情就十分好辦:
只要先試一下 e(g^a, g^b) = w^(ab),再試一下 e(g, g^z) = w^(z),
只要 w^(ab) 和 w^(z) 的數值相同,就等於 w^(ab) = w^(z),也就是 ab=z。
(註:w^(ab) 的數值是 Gt group space 的值。數字是什麼也不重要啊,反正相同就可以)

2. Computational Diffie-Hellman
給定 g, g^a, g^b,找出 g^(ab) 。
這種情況,即使有 bilinear mapp 也沒有用。
因為 bilinear map 只會給你另一個 group space 的值,根本沒有什麼用。

這種 CDH 困難,DDH 容易的特性,
正好幫助我們用 bilinear map 來加密資料,同時又不易破解。

---

例如 Joux 的 3 Party Diffie Hellman,正正使用了 bilinear mapping。
首先 Alice, Bob 和 Carol 持有 a, b 和 c,而且他們是三角關係:
(就是 A <---> B, B <---> C, C <---> A 的關係)

1. Alice 和 Bob 交換 g^a 和 g^b ,
2. Bob 和 Carol 交換 g^b 和 g^c ,
3. Carol 和 Alice 交換 g^c 和 g^a ,

此刻,Alice 擁有 a, g^b 和 g^c,Bob 擁有 b, g^a 和 g^c,Carol 擁有 c, g^b 和 g^a 。
所以:
Alice 可以計算出 e(g^b, g^c)^a = (w^(bc))^a = w^(abc)
Bob 可以計算出 e(g^a, g^c)^b = (w^(ac))^b = w^(abc)
Carol 可以計算出 e(g^b, g^a)^c = (w^(ba))^c = w^(abc)

他們三人就可以用 w^(abc) 作為共同金鑰。

後來 Boneh Franklin 的 Identity Based Cryptography 都使用了接近的概念,
於加密時放置了 g^r 和 g^s,並使用 bilinear mapping 找出 w^(rs) 進行加密/解密。

---

小記:因為 bilinear mapping 太難理解, 所以當 1993 年被發現的時候,它主要是用作嘗試破解 ECC (MOV reduction) 的。雖然理論上破解的難度由 infinite 變成 finite,但仍然十分困難。直至 2000 年左右,Joux,Boneh 和 Franklin 等人發現到「正當」的新用途,也就是 3-Way DHKE 和 IBE 。

---

引用參考:

https://people.csail.mit.edu/alinush/6.857-spring-2015/papers/bilinear-maps.pdf
https://www.math.uwaterloo.ca/~ajmeneze/publications/pairings.pdf

Monday, November 18, 2019

初探 KP-ABE 和 CP-ABE

ABE (Attribute Based Encryption) 是在大約 2000 年左右冒起的新寵。
基本運作原理,是利用 IBE 的方法,以一堆不同的 attributes 去加密文件。
而近年有兩大分類,主要是 KP-ABE 和 CP-ABE:

---

"In a key-policy attribute-based encryption (KP-ABE) system, ciphertexts are labeled by the sender with a set of descriptive attributes, while user's private key is issued by the trusted attribute authority captures an policy (also called the access structure) that specifies which type of ciphertexts the key can decrypt. KP-ABE schemes are suitable for structured organizations with rules about who may read particular documents. Typical applications of KP-ABE include secure forensic analysis and target broadcast [5]. For example, in a secure forensic analysis system, audit log entries could be annotated with attributes such as the name of the user, the date and time of the user action, and the type of data modified or accessed by the user action. While a forensic analyst charged with some investigation would be issued a private key that associated with a particular access structure. The private key would only open audit log records whose attributes satisfied the access policy associated with the private key.

In a ciphertext-policy attribute-based encryption (CP-ABE) system, when a sender encrypts a message, they specify a specific access policy in terms of access structure over attributes in the ciphertext, stating what kind of receivers will be able to decrypt the ciphertext. Users possess sets of attributes and obtain corresponding secret attribute keys from the attribute authority. Such a user can decrypt a ciphertext if his/her attributes satisfy the access policy associated with the ciphertext. Thus, CP-ABE mechanism is conceptually closer to traditional role-based access control method." [1]

---

換句話說,KP-ABE (Key Policy) 的加密者,用一堆 attributes 去加密文件,
然後有個中間人會訂立 policy,再分發具 policy 的 private keys 給不同人。
例如加密者用 "pay_user" 這個 attribute 去加密,然後 policy 可以是 {pay_user, free_user, tom...} 等等,任由中間人決定。
加密者只知道符合 attributes 的人可以解密,但不能預知解密者的全個 policy + attributes 是什麼。

KP-ABE 密文中會有 attributes [2],
所以如果解密者見到密文,而手中沒有符合該 attributes 的 private key 的話,就解都廢事了。

這種加密法,較常在付費服務等情況應用。

---

而 CP-ABE 則不同。加密者定義了整個 access structure (policy + attributes),
中間人的作用只是 based on the policy,分發不同 private keys 給不同人。
情況有點像建立一棵 private key tree,不同 matching 會有不同 private keys。
換句話說,加密者基本上預知到,有什麼種類的人,而且當中有誰可以解密文件。

CP-ABE 密文 (Cipher Text) 中會有整個 access structure [3],
所以如果解密者見到密文,而手中沒有符合該 structure + attributes 的 private key 的話,就解都廢事了。

這種加密法,較常在文件分享等情況應用。

---

Reference:
[1] Changji Wang and Jianfa Luo, “An Efficient Key-Policy Attribute-Based Encryption Scheme with Constant Ciphertext Length,” Mathematical Problems in Engineering, vol. 2013, Article ID 810969, 7 pages, 2013. https://doi.org/10.1155/2013/810969.

[2] https://eprint.iacr.org/2006/309.pdf

[3] https://hal.archives-ouvertes.fr/hal-01788815/document

https://asecuritysite.com/public/cpabe.pdf

Saturday, October 5, 2019

身份基礎加密 (Identity Based Cryptography) 與 無證書加密 (Certificateless Cryptography)

身份基礎加密 (Identity Based Cryptography, IBE)
基本架構:
Alice 想與 Bob 溝通,但沒有 Bob 的 CA Public Key,
所以,他們可以找一個值得信賴的 PKG 用作中間人,儲存加密金鑰。

首先,Bob 向 PKG 註冊自己的身份資料,PKG 就會為 Bob 建立一條非對稱金鑰,並將其公開金鑰放在列表中。當 Alice 想跟 Bob 聯絡,他就可以用 Bob 的身份資料,去查 PKG 的列表,然後取得 Bob 的公開金鑰。最後便可以跟 Bob 聯絡。

另一種玩法(例如 Boneh Franklin)就更簡單,Alice 只需要取得 PKG 的 key parameters,然後在其尾加上 Bob 的 ID (例如 email, 名字)和 timestamp,就直接可以當它做 public key 來用。而解密者只需要問 PKG 取得由 master key 計算出來的 private key 即可解密。[1]

這種做法有幾大好處:
  • Alice 不用儲存全世界人的金鑰,只需找一個 PKG 問它就可以。
  • Bob 不用將自己的公開金鑰告訴全世界,只需告訴 PKG 就可以。
  • 容易理解
 但有以下的壞處:
  • 如果 PKG 的私密金鑰或 master key 泄露,所有人都會受害 (Key Escrow Problem)
  • 當人越來越多,PKG 就需要更多儲存空間,存取時間也會變慢
  • 當 PKG 故障,新成員就不能加密 (Boneh Franklin 則不能解密)
所以,有人提出了無證書加密去解決 Key Escrow Problem。

無證書加密 (Certificateless Cryptography)
基本架構:
跟 IBC 幾乎一樣,只是再加多了一項 PubKey2。
PubKey2 是由 Bob 自己在本機產生,然後只給 PKG 知道公開鑰匙,所以理論上,即使有人破解了 PKG 的私鑰,也不能完全解開密文。事實上,無證書加密並不一定用以上方法。有部分人取走了 PubKey1 和 Private1 直接用,也有人選擇加一段 random string 去 PubKey 中間。

這種做法解決了:
  • Key Escrow Problem
 但同時也帶來了:
  • 金鑰產生速度可能更慢 
  • PKG 需要的空間可能更多
魚與熊掌,確實難以兩者兼得啊!

---

Reference:

[1] https://crypto.stanford.edu/~dabo/papers/bfibe.pdf


Monday, September 23, 2019

Understanding Elliptic Curve Cryptography(橢圓曲線加密學)

要理解 ECC, 首先要了解 Elliptic Curve 的特性和定義。
以下內容會以最簡單的方式表達。

1. Elliptic Curve 的定義:
  • y^2 = x^3 + ax + b
  • 當中 4a^3 + 27b^2 != 0 (有 cusp 或者 self-intersection 交點的曲線都不算 Elliptic Curve)
符合 EC 的例子(a = -7 , b = 10):

---
2. Elliptic Curve 的特性:
  • 用圖片表示的話,你會發現所有 EC 都會有 P+Q+R=0 的特性
  • (注意:這裏用的 P/Q/R 並非普通座標計算,而是有特定的公式)
用圖片表達,你會發現以下的現象:

為了方便日後討論,我們重新定義 EC 的加法「+」和乘法「・」的意思:

加法 (Algebraic Addition): 
  • 假設 P != Q,斜率 m = ( y_p - y_q ) / ( x_p - x_q )
  • 如果 P = Q,斜率 m = 3x_p^2 + a / 2y_p (如果用上一條式,除 0 計不到啊)
  • R = ( x_r , y_r  ) , x_r = m^2 - x_p - x_q , y_r = y+p + m(x_r - x_p)
乘法 (Scalar Multiplication):
  • 這個簡單得多,n・P 不就是 P + P + ... + P 共 n 次嗎?
  • 所以計法就是不斷用上面的加法,一直加到 n 次
  • (但如果真的加 n 次,計算時間就會太繁複,所以有人想到用 double and add 的方法加速,在此不述)
---
3. 加了餘數 (modulo) 的 EC 公式

加了餘數的公式將會變成:
  • y^2 = (x^3 + ax + b) mod p
  • 當中 (4a^3 + 27b^2) != 0 mod p 
  • 假設 P != Q,斜率 m = ( y_p - y_q )*( x_p - x_q )^-1 mod p
  • 如果 P = Q,斜率 m = (3x_p^2 + a)*(2y_p)^-1 mod p 
  • R = ( x_r , y_r  ) , x_r = (m^2 - x_p - x_q) mod p , y_r = [ y+p + m(x_r - x_p) ] mod p
可見即使加了 mod,P+Q+R = 0 的特性仍然生效,而且公式也很像樣(數學證明在此不述)。
以下圖表則是 mod 版本的 EC:

---

4. 找出重複規律

Mod 版的 EC 在不斷進行 P 點相加後,會出現重複規律。
例如 y^2 = (x^3 -x + 3) mod 37,如果從 P=(2,3) 開始,每加 7 次就會出現 R = (0,0) 

我們要找出其最小規律 (subgroup order n) ,任由選一個規律倍數 (order N),
並且只用這個規律中的餘因子 (cofactor h = N/n) 來進行加密。

例子:y^2 = (x^3 -x + 3) mod 37, n = 7, N = 7, 14, 21, 28, 42, 49 ...

最後,G = hP 將會用作加密用途。
h 會成為私密鑰匙。對方如果想找出 h,唯一方法就只有不斷加 P。
同時,因為每次加 P 都要用 double and add,相比傳統 RSA,破解時間會較長。

---
5. 用作非對稱加密 (Asymmetric Encryption)

公鑰 (Public Key): a, b, p, G, P 
私鑰 (Private Key): h

加密 M :C = {kP, M + kG} (k 只有發送者知道)
解密 C:M + kG - hkP = M + khP - hkP = M

---
6. 用作交換共同金鑰 (EC Diffie-Hellman Key Exchange)

假設 Alice 和 Bob 均使用同一點 G:

Alice 公鑰 (Public Key): Ha = da・G 
Alice 私鑰 (Private Key): da

Bob 公鑰 (Public Key): Hb = db・G
Bob 私鑰 (Private Key): db

Alice 計算出 S = da・(Hb) = da・db・G
Bob 計算出 S = db・(Ha) = db・da・G

所以,他們就能有同一條金鑰 S 用作對稱加密。

---
7 . 用作簽署 (ECDSA)

由於只是 DSA 協議的變種,在此不再詳述。

---
參考資料:

CX4024 Lecture 4 - 2018, Anwitaman Datta, Nanyang Technological University

Saturday, September 21, 2019

前向保密 (Forward Secrecy) 與後向保密 (Backward Secrecy)

Having said that there are many online resources discussing these two terminologies, it's actually quite easily mixed up - even for me. I was able to understand this topic a few weeks ago but turns out I forgot and mixed them up again.

According to [1], the story of Forward Secrecy and Backward Secrecy should be:
In short, because Gunther believes the session key exposure will happen in the future, so he used the word "forward" to indicate the current session key is not compromised by the "future" key leaks.

To simplify:
  • Forward Secrecy: If the current session key is exposed, previous session messages are still safe.(即使現時的 session key 曝光,舊 sessions 的資料仍然安全)
  • Backward Secrecy: If the current session key is exposed, the next session messages are still safe.(即使現時的 session key 曝光,下一個 session 的資料仍然安全)
Another graphical explanation from [2]:


In order to reduce confusion, the author tends to use new definitions "past/future secrecy":
  • Forward Secrecy  = Past Secrecy, the word past means to protect past data.
  • Backward Secrecy = Future Secrecy, the word future means to protect future data.
----

The next question would be, what algorithm can offer forward secrecy?

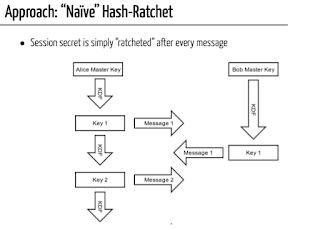
Hash Rachet is a very simple algorithm offering forward secrecy only:
Using the hashed current session key to encrypt the next session, even if the eavesdropper can decrypt the next session message and the session key, he cannot easily find back the last session keys because unhashing the session key results in many possible key (FYI: hash function is many-to-one).

---
Obviously, having forward secrecy is not enough, so Diffie-Hellman Ephemeral (DHE) is the way to offer both forward and backward secrecy.

Rules of DHE:
  • Create a new shared common key in every session (ephemeral = short period of time)
  • Use Diffie-Hellman to share the common key
Therefore:
  • Every session is encrypted with a new common key unrelated to the previous session.
  • Even if the current session key is exposed, since the next key is irrelevant to current key, it is hard to find unless the eavesdropper cracks the Diffie-Hellman.
---

Some protocols such as Signal has a combined use of both two methodologies above.
Largely because:

  • DHE involves computational complexity, so the key update will not be so frequent. In this case, in order to protect the previous communication, Hash Rachet should still be used.
  • To provide extra security - even if DHE is broken, previous messages should still be protected by Hash Rachet.

---

Citations:
[1]: Wang, M. & Yan, Z. Mobile Netw Appl (2017) 22: 195. https://doi.org/10.1007/s11036-016-0741-5
[2]: https://materials.dagstuhl.de/files/16/16353/16353.DominikSchuermann.Slides.pdf


Friday, September 20, 2019

Git 實用操作筆記

 
Forcibly cleaning everything including the directory, to make it clean again:
強行清除所有未 commit 的內容:
git clean -fd
git clean -nd (n is for preview, you can also use i for interactive)

Update everything from server
由 Server 取得更新:
git pull (--all)

Force manually update things from server
以 server 內容取代本機的內容:
git fetch
git reset --hard HEAD

----
放一個檔案去 Staged Area
# stage a file to staged area (a.k.a. add)
git add <filename>
git add -p <filename> #support --patch

反向操作
# unstage a file from staged area
git reset <filename>
git reset -p <filename> #support --patch

----

Reverting all changes to the latest commit, a.k.a. HEAD (discard changes) (for specific file, git checkout file is fine)
強行返回上一個 commit
git reset --hard HEAD

Move HEAD to previous commit
將 HEAD 指回上一個 commit
git reset --hard HEAD~1     #delete everything not committed.
git reset --soft HEAD~1     #keep unstaged things unchanged, combine HEAD~1 things and staged things to staged area
git reset --mixed HEAD~1    #(default) put all (HEAD~1 things, staged things and unstaged things) to unstaged area

Move HEAD to specific commit 
將 HEAD 移到某一個 commit
git reset --hard 0d1d7fc32

#regret about the reset changes
git reflog                    # to list all history
git reset --hard HEAD@{5}     # to reset back to original HEAD (use HEAD 5 as example)

# reverting single file to latest commit
git checkout -- filename

----

Save temporary changes without commit, then display clean workspace.  (a.k.a. "store/hide something secretly somewhere")
暫存未 commit 的內容到 stash 中
git stash
git stash -p #support --patch

Stash only staged files
git add app/controllers/cart_controller.php
git stash --keep-index
git reset

Restore (without popping out)
git stash apply (--index <?>)

Pop out
git stash pop

-----

Check out a remote branch as a local branch
開一個 local 分支,內容是 remote 分支:
git checkout -b LocalName origin/remotebranchname

----

# rewrite history (change previous commits)
git rebase -i HEAD~3     # use last 3 commits as an example

# rewrite history (amend last commit)
git commit --amend

# go back to previous commit (with a new commit)
git revert --no-commit 0766c053..HEAD
git commit

# move HEAD to previous commit then push to server
# (note: it rewrites history, generally not good, git revert might be better)
git reset --hard 0d1d7fc32
git push --force

----

# rename local branch / remote branch
git branch -m <old_name> OR
git branch -m <old_name> <new_name> OR
git push origin :<old-name> <new-name> (delete remote old-name branch and push local new-name branch)

# remove / delete local branch
git branch -d <branch name>

# remove / delete remote branch
git push <remote_name> --delete <branch_name>
git push <remote_name> :<branch_name>

#force update the remote branch list
git remote update origin --prune OR
git pull -p

# force push the local branch to remote (ignoring the remote status)
git push origin --force

----

# show abbreviated commit hash (short hash)
git log -1 --abbrev-commit

# remove all branches named with chriz.chow
git branch -r --list "*chriz.chow*" | sed 's/origin\///' | xargs git push origin --delete

----

Sometimes if you want to checkout a branch (e.g. dpp), but you also have a file called dpp.
When you run "git checkout dpp", Git does not know what operation you want.

To switch to dpp branch, you can run:
git switch dpp

To restore the dpp file, you can run:
git restore dpp

Alternatively, you can also add double-dash to indicate it is a file path:
git checkout dpp --

Tuesday, September 3, 2019

常用 Makefile 內建函式

 $(patsubst $(SRC)/%.c, $(BIN)/%, $(wildcard $(SRC)/*.c))
Name:     Text FunctionPattern Substitution
Rule:       output := $(patsubst pattern, replaced_with, input_text) 
Result:    From src/a.c src/b.c src/c.c to bin/a bin/b bin/c  .

$(subst ee,EE,feet on the street)
Name:     Text FunctionSubstitution
Rule:       output := $(subst from, to, text)
Result:    fEEt on the strEEt 

$(foreach OP, ProgA ProgB ProgC, good/$(OP))
Name:     Foreach Function
Rule:       output := $(foreach variable, list, text)
Result:    good/ProgA good/ProgB good/ProgC

$(filter-out main1.o main2.o, main1.o foo.o main2.o bar.o)
Name:     Text Function Filtering Out
Rule:       output := $(filter-out pattern, text)
Result:    foo.o bar.o

$(shell ls | wc -l )
Name:     Shell Function
Rule:       output := $(shell command)
Result:    Number of files

$(addprefix $(OBJDIR)/, foo.o bar.o baz.o)
Name:     File Name Function - Add Prefix
Rule:       output := $(addprefix prefix, names...)
Result:    objdir/foo.o objdir/bar.o objdir/baz.o 

$(findstring a, a b c)
Name:     Text Function - Find String
Rule:       output := $(findstring find, in). If it is found, output = find, else, output = empty
Result:     a

$(strip    a b c  )
Name:     Text Function - Strip (Remove leading and trailing whitespaces)
Rule:       output := $(strip string)
Result:    "a b c"

$(notdir src/foo.c bar.c)
Name:     File Name Function - Not Directory (basename)
Rule:       output := $(notdir names...)
Result:    foo.c bar.c

$(call reverse, a b)      #given that reverse = $(2) $(1)
Name:          Call Function
Behavior:     Call defined variable with parameters
Rule:            output := $(call variable, param, param...)
Result:         b a

$(eval $(call LINK_TARGET, $(BIN)/$(_bin)))     #given that LINK_TARGET is a variable defined earlier
Name:           Eval Function
Behavior:      Create a new makefile environment with the argument passed into eval, then parse it just like makefile syntax. 
Rule:             output(empty string) := $(eval argument)

Monday, September 2, 2019

Makefile 四種等號用法


Lazy Set

VARIABLE = value
Normal setting of a variable - values within it are recursively expanded when the variable is used, not when it's declared
(that means it fetches/parses the value only when you use the variable)

Immediate Set

VARIABLE := value
Setting of a variable with simple expansion of the values inside - values within it are expanded at declaration time.
(that means it fetches the value immediately, and store the content to the variable)

Set If Absent

VARIABLE ?= value
Setting of a variable only if it doesn't have a value

Append

VARIABLE += value
Appending the supplied value to the existing value (or setting to that value if the variable didn't exist)